
by Tim "Tooth Protector" Warner (timandsusan2002 at earthlink dot net)
This tutorial will get you up and running very quickly playing Atari 400/800/XL/XE 8-bit games on your Microsoft Windows-based computer by using the Atari800Win Plus emulator. I've decided to focus on Atari800Win Plus instead of the original Atari800Win emulator because Atari800Win Plus supports additional features that are either missing from or more difficult to use in Atari800Win.
To play Atari 8-bit games on your PC by using Atari800Win Plus you'll need the following files:
Visit the following Web site to download the latest version of Atari800Win Plus:
http://atariarea.histeria.pl/PLus/index_us.htm
To find the necessary Atari support ROMs, I would recommend that you visit one of the following Web sites:
http://home.mchsi.com/~tomwells99/
http://www.concentric.net/~Twist/atari800win/
http://vjetnam.hopto.org/atari/index.php?frame=roms
Finding Atari 8-bit game ROMs in the wild can be a somewhat challenging task. I would say that your best bet is to try the peer-to-peer file-sharing networks. In particular, you will doubtless have luck if you access the eDonkey networks by using a client application such as eMule.
After you have downloaded all required files, your first step is to use WinZip or some other ZIP file-management utility to unpack all of your files. Begin by creating a folder named on your hard drive (in this tutorial we will use a folder named A800) and unpacking the Atari800Win Plus emulator files into it.
While you are at it, create a folder named SUPPORT inside your A800 folder to store your support ROM image files, a folder named CARTS to store your game cartridge ROMs, a folder named CASS to store your game cassette ROMs, a folder named DISKS to store your game disk ROMs, and a folder named EXE to store your executable game ROMs. After you have created your folders and have placed all of the ROM files in their respective locations, your A800 folder hierarchy should look something like the following:


You'll notice that I deleted all of the .A8T files from the A800 folder. Contrary to popular belief, these are not game ROMs. These are simply "cheat" files that allow you to enable in-game cheat codes. If you aren't interested in cheating, then I would recommend you nuke these files from your A800 folder.
That's it for initial file placement and such. Now let's start Atari800Win Plus and get it configured to play some 8-bit games.
To begin, open your A800 folder and double-click ATARI800WIN.EXE to start up Atari800Win Plus. If this is the first time you've started the application, the Atari800Win Plus Setup Wizard: Step 1 of 3 dialog box will appear.

The first page of the Setup Wizard gives you the opportunity to create Start menu and/or desktop shortcuts for Atari800Win Plus. Make your choice and then click Next to continue.

In the second page of the Setup Wizard we must specify the path to our Atari OS and BASIC ROM images. Although you can click each button in this window to browse for your support files individually, because we placed all of these files in a single folder it is much easier to click Search and point the emulator to our SUPPORT folder.

In the Select folder dialog box, browse to locate the SUPPORT folder and then click OK. When you see the Setup Wizard dialog again, it should be populated with the correct paths to your Atari support files.

Click Info to get specific information regarding your Atari 8-bit support files.

Click Next to continue. In the third dialog in the Setup Wizard, click to select file types that you want to associate with Atari800Win Plus. A word of warning: if you use other emulators, then you might not want to associate .ROM and .BIN image files with Atari800Win Plus unless you are certain that you want to do this. Click Finish to exit the Setup Wizard.

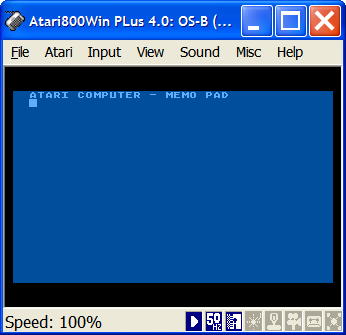
Once you have completed the Setup Wizard, the Atari800Win Plus interface appears. You can choose a machine type by opening the Atari menu and pointing to Machine type. The following screen shot shows the emulator running as an Atari 800 home computer (OS-B):
The following screen shot shows the emulator running as an Atari XL/XE home computer/game system. HINT: I've had the best luck playing 8-bit games with Atari800Win Plus when the emulator is configured to run as an XL/XE computer.

The following screen shot shows the emulator running as an Atari 5200 game console. Yes, that's correct: you can play Atari 5200 game ROMs by using Atari800Win Plus. Play 'em if you've got 'em!

The View menu in Atari800Win Plus contains our graphics-related options. Note that you can run the emulator in full-screen mode by choosing Full screen. For now, though, let's select Graphics options from the View menu.

I would suggest that you play around with the display options in the Graphics Options dialog box to figure out which settings work best for your particular computer.

Next, let's configure the game controls. First, let's configure the keyboard to emulate the standard Atari joystick. From the Input menu, choose Joysticks.

If you have used z26 to play Atari 2600 games in emulation, then you are probably accustomed to using the ARROW keys to move and the right CTRL key to fire. Thankfully, this configuration is a preset. In the Joystick Options dialog box, open the 1 drop-down list box under Joysticks and choose the Arrows + Rctrl as fire option.

To configure a custom key set, open the 1 drop-down list box, choose Keyset A, and then click Keyset A.

In the Configure Keyset A dialog box, click in a command box and type the key/press the joypad button to which you want to map the command. Click OK when you are finished.
You can also instruct the emulator to capture your mouse for use as a control device (this is particularly useful for trakball games such as Centipede). To do this, Click Input => Mouse device and select the Atari hardware to be emulated by the mouse.

Next, after you've loaded a game you can either click Input => Capture mouse or you can press F12 to capture the mouse. Note that once you have captured the mouse you'll have to press F12 again to release your mouse from the emulator! You can tweak mouse-emulator settings by clicking Input => Mouse.

Most virtual machine-related configuration is performed through the Atari menu in Atari800Win Plus. Let's take a quick tour through these options, shall we?

Click Atari => Machine type to specify the type of Atari hardware you want to emulate.

Click Atari => Memory size to specify how much random-access memory (RAM) your virtual computer has installed.

Click Atari => Video system to select a region (NTSC or PAL) for the emulated video system.

Click Atari => Options to disable BASIC (required for some games), increase the speed of the emulation, pause the emulation, and configure various patches.

Click Atari => ROM images to revisit the ROM Image Selections dialog box, from which you can specify where your support files reside.

Click Atari => Disk drives to open the Drive Selections dialog box. From this dialog box you can use the D1 through D8 buttons to mount .ATR floppy-disk image files. You can also use the drop-down list box besides each virtual floppy disk drive to specify read/write or read-only drive access. Please note that some 8-bit games require read/write access to the virtual floppy disk.

Click Atari => Tape recorder to open the Cassette Control dialog box. From this dialog box you can use the Browse button to locate and mount .CAS cassette image files.

Click Atari => Hard disks to open the Pick Virtual Hard Disk Directories dialog box. From this dialog box you can grant the emulated Atari home computer access to the directories on your computer's hard disk. To do this, simply click one of the H buttons and browse to the directory to which you want to map an Atari virtual hard disk.

Click Atari => Reset to perform either a warm reset or a cold reset of the emulator.
That's it for initial configuration. Now let's play some games!
Now, the moment we've all been waiting for: actually playing games in the Atari800Win Plus emulator. By far, the easiest way to launch a game ROM, regardless of its type (cartridge, cassette, or floppy disk), is to click
File => Autoboot image.

In the Select an Atari image dialog box, use the Look in control to browse to the appropriate ROM folder. Note that the Files of type drop-down is already configured to display most, if not all, supported Atari image types. Select the desired game and then click Open.

As far as configuring controls are concerned, I would suggest you click Help => Keyboard layout from within Atari800Win Plus. Here is a relevant snippet from that control list:


You can load .EXE game ROMs in Atari800Win Plus by clicking File => Load executable.

Note that the File menu in Atari800Win Plus includes several Attach and Detach commands, depending upon the type of ROM file under consideration. If you use an Attach command to attach a game cartridge, cassette, or floppy disk image file, then you might have to perform a warm reset (by clicking Atari => Reset => Warm) to force the emulator to recognize the new ROM image file.
Finally, we arrive at the subject of save states. To save your game progress at any time, simply click File => Save state => Normal.

In the Save Atari saved-state file dialog box, use the Save in control to browse to the folder where you want to save your save-state file. Give the file a name and then click Save. The savegame will be saved with the .A8S extension.
To load a savestate, click File => Load state. (You do not have to attach the game media before you issue this command.) In the Load Atari saved-state file dialog box, locate your savegame file, select it, and then click Open. You will receive a message in the emulator window stating Paused (F9 to continue). As soon as you press F9, your savegame will be restored instantly.
Well, that about covers the basics of using Atari800Win Plus. I hope that you are now able to enjoy all of those fantastic 8-bit games by using this fine emulator. Happy gaming!