|
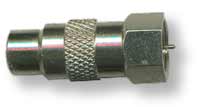
Coaxial (F-type) to Female RCA Adapter
Radio Shack part #278-276

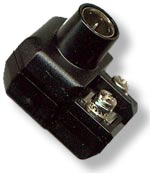
Manual TV/Game Switchbox with Coaxial Output
300 to 75 Ohm Matching Transformer
|
Coaxial is by far the easiest way to connect your old game
system, and the method most people will use. This is the 'cable
ready' input that is found on every TV made today (and for
some time now). If you don't at least have this connection,
you have our sympathy. There are several methods you can use
for this connection.
The best way is to get a Coaxial to RCA adapter (left). It
is cheaper, smaller, and provides a better signal than the
traditional TV/Game switchbox. This is a small plug that will
cost you about $3 at Radio Shack. It is called a "Gold-Plated
Phono-to-F Adapter" and the Radio Shack part number is
278-276. Just connect it to the RCA cable of the game
system, then plug the other end into the coaxial ("cable")
jack on the TV. Set the TV to the channel that the game system
is set to (usually 2-4), and your're ready.
If you still have an old TV/Game switchbox and you don't
want to buy something new, you can use that. You can also
purchase these at Radio Shack for about $5, but if you're
going to go buy something we recommend the adapter described
above. Some TV switchboxes have built-in coaxial output, some
do not. If yours does not, you will need to buy a 300 to 75
Ohm matching transformer (again, about $2 at Radio Shack).
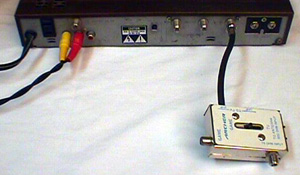
If you you do have coaxial output on your switchbox, just
plug the game system's RCA cable into the switchbox, connect
the switchbox to your TV's coaxial ("Cable In")
jack, and push the switch to "Game" or "Computer".
Note - you cannot use the 'automatic switching' boxes that
newer game systems like the NES use - the signal in most old
systems is not strong enough to trigger the automatic switching,
so be sure you buy a manual switchbox.
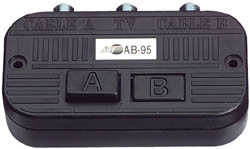
Most new TV/Game switchboxes will allow you to connect your
Cable TV and Videogame system at the same time, but the picture
is often less than ideal. We recomend a coaxial selector -
this will allow you to choose between inputs (game, cable,
whataver) at the touch of a button. We found this one at Parts
Express for about $6.
 AV Switchbox
|
 If
you've just dug your old videogame system out of the attic, you might
not remember exactly how to connect it. They're not quite like modern
game systems, and may require something extra to connect it to that brand
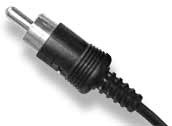
new TV you have. To the left is the cable you should see attached to your
videogame system. It is typically called RCA, and you will have to use
some sort of adapter before you connect it to your TV. While it looks
like it should fit into one of the composite jacks (and it will actually
fit), that will not work because the audio and video signals are being
carried in the same cable. In order to use the composite jacks on your
TV, you will have to separate the audio and video signals somehow (described
below).
If
you've just dug your old videogame system out of the attic, you might
not remember exactly how to connect it. They're not quite like modern
game systems, and may require something extra to connect it to that brand
new TV you have. To the left is the cable you should see attached to your
videogame system. It is typically called RCA, and you will have to use
some sort of adapter before you connect it to your TV. While it looks
like it should fit into one of the composite jacks (and it will actually
fit), that will not work because the audio and video signals are being
carried in the same cable. In order to use the composite jacks on your
TV, you will have to separate the audio and video signals somehow (described
below).
 Now
if you don't want to do that, but you're using a monitor or tv without
a coaxial input (for example, a Commodore monitor), there are other
options. You will still have to convert the signal to coaxial first
(see Coaxial section). Then, if you have a VCR handy, you can run
the coaxial connection into the VCR, and then use the composite
outputs from the VCR. This will not give you the true signal clarity
of composite audio/video, but it will allow you make that composite
connection. If you don't have an extra VCR for this, you can probably
go buy a junker at the local thrift store - the tape mechanism doesn't
need to work, just the demodulator. Demodulator's rarely go bad
on VCR's, they're usually thrown out because of the tape mechanism.
Now
if you don't want to do that, but you're using a monitor or tv without
a coaxial input (for example, a Commodore monitor), there are other
options. You will still have to convert the signal to coaxial first
(see Coaxial section). Then, if you have a VCR handy, you can run
the coaxial connection into the VCR, and then use the composite
outputs from the VCR. This will not give you the true signal clarity
of composite audio/video, but it will allow you make that composite
connection. If you don't have an extra VCR for this, you can probably
go buy a junker at the local thrift store - the tape mechanism doesn't
need to work, just the demodulator. Demodulator's rarely go bad
on VCR's, they're usually thrown out because of the tape mechanism.